I suppose I should blog about the S-N-O-W. We have a LOT of it and it is still coming down with no sign of an end to it.
But I won’t.
Instead I am going to blog about free machining.
I had a hit on my blog from a lady in America who has posted about my art quilt free machining on her blog. Many thanks for her complements.
It set me thinking. Although I am a fibre, textile and mixed media artist using many many different techniques in my work, I have always been an avid free machiner.
In my early days I was influenced by Liz Hubbard and bought both of her books. It led me to begin buying my stock of threads: cotton, rayon and metallics. I even dyed my own variagated threads and wound them onto empty reels – thanks to a gadget my husband made for me to make it easier. At the time, Guttermann sold packs of 50m themed threads and I bought every set – almost every colour that Guttermann produced. Then I added other makes to them and started my collection of rayon and metallic threads. I am still adding to the collection. You can never have enough threads.
Another influence was Annameike Mein and her work led me to creating 3D pieces.
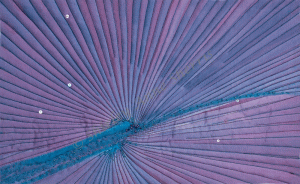
Free machining has continued to be an integral part of my work and at the moment I am really into creating free machined art quilts. I have already posted a number of them in recent posts and have just finished another seven of them – yet to be photographed.
For this post, I thought I would show some of the diversity of free machining dating back over many years.
Here are some examples of my ‘Thread Painting’. I took the photographs, painted the fabric then free machined.


I made a box with thread painted images on each face and a gold thread free machined image on the inside lid.

These were the days before computers and printers. I had to use the negatives and project them onto fabric (mainly calico and sometimes satin for a richer finish) and mark out the features with a pencil before painting with a mixture of diluted acrylics, fabric paints and silk paints. Oh how technology has changed things; computers, digital cameras, printers and many new products appearing all the time to continue the diversification – wonderful.
I also created the covers for books – this one is a digitised image created in photoshop, printed onto transfer paper, applied to fabric then free machined. Free machined lace added surface texture thanks to soluble fabrics.

I used free machining to create the surface texture on fabrics for bags as with these two bags. They started out as a silk skirt my daughter no longer wanted. I free machined and surface embellished the squares of the design before making up into bags.


When I was creating jewellery, I used a great deal of free machining as with the next series of images.


This last jewellery piece was the one chosen for the cover of my book – Embroidered Jewellery. Sorry, but I could not miss an opportunity to give it a plug. All the techniques for creating these pieces are in the book, however, the skill of free machining is down to practice and dexterity.
As soon as I have managed to photograph my latest art quilts I will post images of them but there are lots to see on previous posts – Domes of Venice ; Purple palm; Richmond falls; Himalayan Poppy; Rusty kaleidoscope to mention just a few!!
So as I have shown, free machining is a very diverse technique once mastered and modern sewing and embroidery machines have made it even easier so if you haven’t tried it – have a go.
And it is still SNOWING!!!
Cheers for now.


